Monday, June 29, 2009

Majestic Mondays

You've been seeing alot of these "Shroomies" lately.
They are quite popular!
You will want to be sure to swing by the
QKD store and pick them up today.
*
My sentiment is handwritten
and it's REALLY buggin' me!
Isn't that funny?!
It's not that bad but...
YKWIM.
I don't think I know of anyone
who loves their own handwriting.
I actually like mine,
just not on my cards.
I refuse, however,
to TYPE my personal messages
for my cards.
There is nothing more heartwarming
than a sweet personal note
from a friend.
(I don't get those much...
it's okay to feel sorry for me...
as long as it's enough to send me a card...
right now...
no pressure...
LOL!)
*
But seriously,
I strongly believe a sweet little
handwritten note or message
means all the world to most people.
So try it today!
HANDwrite a note to someone you love.
They will love it!
*
Check out
Queen Kat Designs
for this "Shroomies" image and more!

Sunday, June 28, 2009

Are you ready for a sneak peek?!

Greetings to all! Thanks for stopping by the Queen Kat Designs Blog today!

This week we celebrate America! Ready for fireworks, BBQs and fun? I sure am!


On July First we are having a MAJOR release party!! Wednesday Blog hop, and TONS of NEW stamps are being released!!!! Are YOU excited?? I AM!!


So I figured I would give you a sneaky peek, sound fun? This little "chicky" :) is sooooooo cute!! You will love her!
Here it is...

Stamps Used: (a secret) Your My... -Queen Kat designs
paper Used: Scarlet Jewel, sweet blush Papertrey Ink, eva BasicGrey
Ink Used: Scarlet Jewel PTI
Accessories Used: Foof-a-la buttons, hemp twine

If you havent checked out Anessa's Blog post below make sure you do she made an AWESOME card!!! Beautiful!
Queen Kat Designs stamps on Sale till Tomorrow, 35% off!!! Then we are having a sale for the New Release celebration!!! make sure you come back the First of July!!! Exciting stuff happening!!
have a great weekend!!
Till Later!

Sundays are for Stampin'

This is my first Sunday post for Queen Kat Designs, so I hope my card meets with your approval =)

I am not a person who can resist the fairies that QKD sells, and the only thing better than the fairies is the fact that they're on sale until tomorrow, at 35% off!! Go snag some fairy magic for yourself!

I used a bit of a different technique on this card, and amusingly it was completely accidental. I grabbed a ClearSnap Sienna dye ink pad rather than a pigment pad, and although I had everything prepared, that dye ink dried within seconds, so none of my clear embossing powder stuck. Given that I had this card in mind for a Sunday post, I decided it would be in bad taste to actually curse my luck, but rather I asked my Maker if He could bless me with a different plan. Ask and ye shall receive. Suddenly I remembered that I'd picked up one of the new Versamark Dazzle pads with shimmer to the watermark. Without cleaning the dye ink off my fairy stamp (it was as dry as the desert anyway), I pressed it once onto a Versamark Dazzle Frost pad, then stamped just a hair off-kilter from my original, dye-stamped image. After heat-embossing I was left with a perfectly embossed image with glittery shimmer to it! In the picture below what looks like maybe air pockets or divets is the glittery shimmer that is subtle and gorgeous in the 'right' light!


Since this card is a CASE of one I found on Amy Sheffer's blog, I wanted the same scoring on the background paper that Amy accomplished on her white background, BUT I don't own a Scor-Pal. I glanced over at my handy 12" Cutterpede cutter and noticed the measured grooves in it, and I thought HEY!! Why can't I use my dry-embossing tool and those grooves to get me some scores?! So that's what I did. I found it best to first score with the bigger 'ball' end of the tool, then for some added clarity gently press with the smaller 'ball' end, being ever so careful not to poke all the way through. It's not that I don't want a Scor-Pal, because I certainly do, but my finances often dictate that I establish work-arounds more often than not =)

Papers: Pure Luxury Cardstock, Gina K; Tres Jolie Chocolat, SEI; Bazzill Bling
Stamps: Willow Shimmer Fairy, Queen Kat Designs
Ink: Sienna Ancient Page, ClearSnap; Dazzle Frost watermark, Versamark
Dies: Classic Frame/Labels Three/Symbology, Nestabilities
Misc: half-pearls adhesive gems, K&Company

Thanks for reading my very first QKD post, and have an extremely blessed Sunday!

Saturday, June 27, 2009

Saturday Stamps

Wow, Saturday has really gone quickly for me today and I am finally stopping to post my stamping creation from today. I have a friend who is going through some problems, so my card today is for her. I so did not want to have to worry about finding papers to match, so I used some paper from a Royal Card Kit -- it is so nice just to pull out the kit and not worry about what matches and what doesn't!

I started to use my Shroomies, but since I am not the only person who loves them around here, check out the previous posts this week, I decided to use Flutterby instead. For my sentiment, I pulled out You're My stamp set. Just quick and easy and now I have a card to pop in the mail to my friend.


Don't forget that Wednesday is new release day. I can't wait to show you my favorite layout that I made using some of the great new stamps!

Thursday, June 25, 2009

Kickin' it with my shroomies

Happy Thursday! I wanted to show off one of my very most favorite QKD stamps which is Shroomies! I just adore them and they are so easy to color! This time I used my Copic markers and added some Stickles for some added bling.

I used some dp from cosmo cricket, gray cardstock and the new Dusty Durango from SU! I was so thrilled when everything matched so well!

Want some shroomies of your very own to pop up at your house? They're on sale 35% off right now in the store! Head over and get some of your very own!
Enjoy!

Edited: What a coincidence that Tina and I used our Shroomies this week! Ha Ha! See how versatile they are? Plus everyone loves them!!

Shroomies Revisited

I decided to use Shroomies today, it has been too long. I used a super fun layout, perfect to showcase how sweet this image really is.
The papers are from October Afternoon and Me & My Big Ideas, a match made in heaven. Bold patterns with a great color scheme.

I can't seem to resist adding pearls or crystals to the mushrooms, I always add a little dimension that way.

Why don't you pull out one of your favorite stamps that you have used in a while and have some fun with them?

Don't forget that this and all other stamps are on sale now through June 29th at Queen Kat Designs store, get yours today.

Happy Thursday!!


Tina

Wednesday, June 24, 2009

Royal Kat Wedneday Blog Hop

It's Wednesday again and you know what that means, it's the Queen Kat Royal Wednesday Blog Hop! Get ready for a fun hop "VINTAGE" royal hop this week. That's right the challenge to the Royal Court was to making something vintage. Basically using the theme what vintage means to you. Is it a specific image, colors or design? Get ready because I know the Royal Court will knock your socks off.

Check out what the awesome Juliet made for this Vintage challenge:

This image is so amazing and definitely Vintage. It's from the vintage QKD collection and can be found here in the Castle. While you are visiting the castle you will also want to check out the super awesome 35% off sale going on!

Now carry on and hop along to Juliet's blog for another one of her awesome vintage creations, you won't be disappointed!

Thanks for hopping with us today!

Here's the complete hop link list just in case you get lost you can come back here. :)
QKD Blog- you are HERE!
Jules- http://julietds.blogspot.com
Helene- http://2amscrapper.blogspot.com/
Whimsical Ink Sorority- http://whimsicalinksorority.blogspot.com
Jacquie- http://jacquiemakescards.blogspot.com
Vicki- http://qksc.blogspot.com
Maria- http://riacreations.blogspot.com/
Andrea- http://mystampingheaven.typepad.com
Anessa- http://alienanessa.wordpress.com

Till later..


Father's Day Matchbook

Hope y'all had a great Father's Day with the dads, husbands and all the wonderful dads in our lives. We just had a simple dinner out with the man of the house's choice of food: barbecue.
Just wanted to share a simple matchbook album I made for the special man and Dada in our family:


I also discovered that stamping on chipboard is an oh-so-easy way of decorating a project. On the cover, I used Queen Kat Designs Aged Text Background Stamp on the cogs. At the back, I used Queen Kat Designs Bubbles Background Stamp on the chipboard house.

As a final touch, I always like to use my Queen Kat Designs Coffee Stain Stamp as just a little extra to have that aged and distressed look.

For more pictures, kindly visit the QKD Gallery here. And to check out all the cool stamps I mentioned and more, do check out the QKD Store here.
Have a great day!
*hugs*
Nina

Tuesday, June 23, 2009

Oh Sunny Day!

It is finally "summertime" hot here in MN! It was 93 yesterday and we're headed to the beach today! In honor of the short summer here, I wanted to use the fun flip flops stamp from Beach Essentials. I used a strip of patterned paper with the "Soaking up the sun" and a fun flip flop embellishment to top it off. It's hard to pick up in photos, but I used a stardust glitter pen over the flip flop straps, flowers and the words strip to add a little shimmer.


Hope you all have a warm summer day!

Kelly

Monday, June 22, 2009

July Royal Kit

The Royal kit is here and it's fantastic!!!! Surf over to the QKD store and reserve yours now. It's HOT!! Here are a couple of cards that I made with the kit.
We have a new stamp Designer that will debut in July. Her name is Nichole Cottrell and she's fantastic! She designed all of the flower stamps for the Royal kit for July!

About the kit... We're featuring the Mimosa papers from SEI this month. Some of them are foil, some are glittered and some are pearled. This month we've added some embossed velvet papers for great backgrounds. We've combined both patterned paper and patterned cardstock for this kit. It's a very lush and tropical theme. Come and get yours now, you won't be sorry!

Majestic Monday


So I bought a bag of buttons
and these HUGE ones happened to be
in amongst the batch of buttons.
Talk about "out of this world!"
he he he...
I didn't think I'd ever use them
but "Space Girl"
is so cute and unique
that they compliment her nicely, I think.
*
Be sure to check out
Queen Kat Designs
for this cute and funky image
as well as tons more.


Sunday, June 21, 2009

Sunday fun and Fathers day!

Hope everyone is enjoying their sundays celebrating the Fathers in your life!

Here is a quick card to share!
I used the new Aged Compass and Your My... sentiment set! Really great for fathers day cards or any masculine card you need! I stamped the sentiment many times and chose a place to make the sentiment stand out and stamped in black ink.

Stamps Used: Aged Compass, Your My...-Queen Kat designs
Paper Used: Ruby red, baja breeze, whisper white SU, offbeat basicgrey
Ink Used: Versafine black onyx
Accessories Used: Hemp twine SU

All Stamps still 35% off, till the 29th!! Woo Hoo! Head to the Store to check them out!
Have a wonderful day of celebrations and fun! Thanks for stopping at the Queen Kat Designs Blog!
Till Later!

Saturday, June 20, 2009

Royal Kit Club?

Have you had time to check out the Royal Kit Club? With a stamp set and patterned paper and embellishments all in one, it is a great way to create cards and layouts without having to think! Don't you love that!!! The July kit features SEI -- so cute!!! But also check out the past kits because there are some fab past kits still in stock that are to die for!!!

I used the April 09 kit for a layout and a card -- there are still both 12 x 12 and 6 x 6 kits in stock.


Thursday, June 18, 2009

QKD July Get Inked! Kit

Here's what you'll get In July Get Inked! Kit.
1 Stamp Set designed by me (Message In a Bottle Stamp Set)
1 Impress Dye Ink Pad
1 How To's/ Technique News Sheet written especially for this kit
1 RangerTeal Paint Dabber
and here are the samples that I've created to be included in the how-tos/technique sheet.


Did you notice that this month I've included a mini layout in the technique sheet. I just want to create a sample to show you all that these stamps are very versatile. It could be used on layouts too.
Grab your kit now before it's all gone. here's the link to it.
This set of stamps is not available anywhere else because it's specifically designed for this kit.

My very first post!

Woo Hoo! My very first post to the Queen Kat blog! A little introduction, my name is Lara and I am one of the brand spankin' new Royal Stamping maids. I am SUPER excited to join such an awesome group of ladies and I hope you'll enjoy my creations as much as I enjoy making them!

This card was made using the Friends stamp set which just so happens to be on sale 35% off!! A fine deal if you ask me!!


I stamped the butterfly with black ink and colored with my Copics. Since everything needs a little bling every now and then, I added some purple rhinestones. You like? You wanna make one of your very own? Well head on over and get some stamps on sale!
Enjoy!
Lara

Cupcake Friends

Cupcake Friends is one of my favorite sets, so versatile and so fun to color.

Right now, it's on sale....hurry and pick it up.

I decided to dress up the butterfly a bit by adding some Stickles. They really add the perfect amount of sparkle and dimension. I also love that the scallop border is just peeking out under the ribbon. The cupcake was cut out and embossed with my nesties. Sometimes it's the little details that add so much to your card or project.

Hope you're having a fabulous Thursday!

Tina

Wednesday, June 17, 2009

Queen Kat Royal Wednesday Blog Hop

Welcome to another edition of Queen Kat Royal Wednesday and Blog Hop! This week we have a super fun one for you. How does painting sound to you? Painting on our cards and pages may be messy but lots of fun. This week the design team was challenged to do just this. Any form of painting will do. So pull out those acrylic paints, perfect pearls, watercolors or any other medium for painting and get to work. We would love to see what you come up with.

In the meantime here is something I did using acrylic paints as my background paper.


Thanks for stopping by Queen Kat Royal Wednesday this week and be sure to hop on over to Jacquie's blog for some more fun inspiration. Also, check out the huge stamp sale! 35% off of all QKD stamps!!

Till later...

Tuesday, June 16, 2009

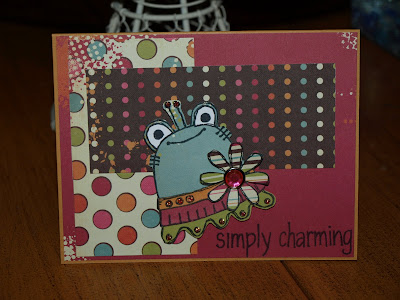
Simply Charming

Paper piecing is such a fun way to bring lots of colors or patterns to your project. I decided to do that today with this cute little thing. I used one 6x6 paper pack to do all the piecing as well as the other layers of my card. I just stamped her onto a few different colored papers as well as white, I also stamped to flower onto patterned paper to use as an accent on her dress.

Thanks for stoppin!
Kelly

Monday, June 15, 2009

Majestic Monday


Whoot Whoot, for you!
You are up and at them this bright
and Magestic Monday!
(I know it's tough but we'll get through it, he he.)
*
Used my "Hoot" stamp from
Queen Kat Designs
for this cute encouragment greeting.
*
You don't have to have a specific
reason to send a card like this.
I think I will send it to let
a friend know I've been thinking of her.
And when I think of her,
I think of how great it is that
she is my friend.
That is reason to
"Whoot Whoot!"
*
Have a great "whootin'" day!


Sunday, June 14, 2009

QKD russian dolls and the Twist and Smoosh Ribbon Tutorial!!

Hi Everyone!! This is my first Official Queen Kat designs Blog Post!! I LOVE being a royal stamping maid and I hope you enjoy this tutorial!
I wanted to show everyone how I do the ribbon technique taught to me from my SU demo! She thought of this all on her own! It is really cool and I love using it!!

I dont have video so I took a series of pictures and hope I can tell you good enough how to do it! It is pretty easy. I call it the twist and smoosh technique :) So here goes!!

Here are all my supplies I used, my QKD stamps, my scissors, my cardstock already cut out, my ribbon and my sticky strip. I have my card already pre assembled so all I have to do is throw it together.

I put my sticky strip in the middle of the paper I want to go directly onto my card base.

I tried to keep it pretty straight across.

make sure it wraps around the back a bit so you can attach the ribbon ends back there hidden. You then remove the red backing of the tape.
Attatch one end of the ribbon on one side back.
I leave the ribbon on the roll if possible, if you want to cut it make sure you cut extra for the twisting and smooshing! You want to start on one end and work from that end across to the other side.
You start by twisting the ribbon, just like a twisty tie just one twist, then smoosh that twist down onto the sticky strip.
Then twist again... and then smoosh again... make sure you keep twisting in the same direction throughout the whole time.
Keep going like that the whole time, twist one time then smoosh, twist another time then smoosh, keeping the twists not too big and close together is the best!
You get a ripply effect! Still twisting...
and then Smooshing down onto the sticky strip...


When you get to the end snip it off with some to wrap around the back and stick to the sticky strip.

Here is my final piece of paper with the ribbon technique all the way across.
You can make it look like you want but this is how mine turns out.

Here is my final card fully assembled.

Stamps Used: Russian Dolls, Your My...-Queen kat designs
Paper Used: Pink armadillo My Paper Studio
Ink Used: Versafine Black Onyx
Accessories Used: Whisper white satin ribbon SU, sticky strip, copics, crystal effects covering the dolls completely.
Hope you learned how to do this technique any questions email me jacquienordaune@gmail.com
Thanks for stopping in at the Queen Kat Designs Blog to visit us!! Come back again!!
GO and shop at the store where you will find the amazing Queen Kat Designs Stamps! Click on the New releases and see all the new mermaids, these russian dolls and MANY more!!
Till Later!!

LinkWithin

Related Posts Plugin for WordPress, Blogger...